Fully Automated AI Infrastructures with Terraform and Akamai Cloud
Infrastructure as Code (IaC) tools such as Terraform, OpenTofu, or Pulumi are used across our industry to manage predictable cloud infrastructures and have proven how important unattended infrastructure management is when building software at scale and delivering with resilience. AI cloud infrastructures are no different and should be described using IaC as well to guarantee automation and repetitive provisioning. In this article, we’ll explore how to build a Terraform project to provision a ready-to-use — yet simple — inferencing infrastructure on top of Akamai Cloud.
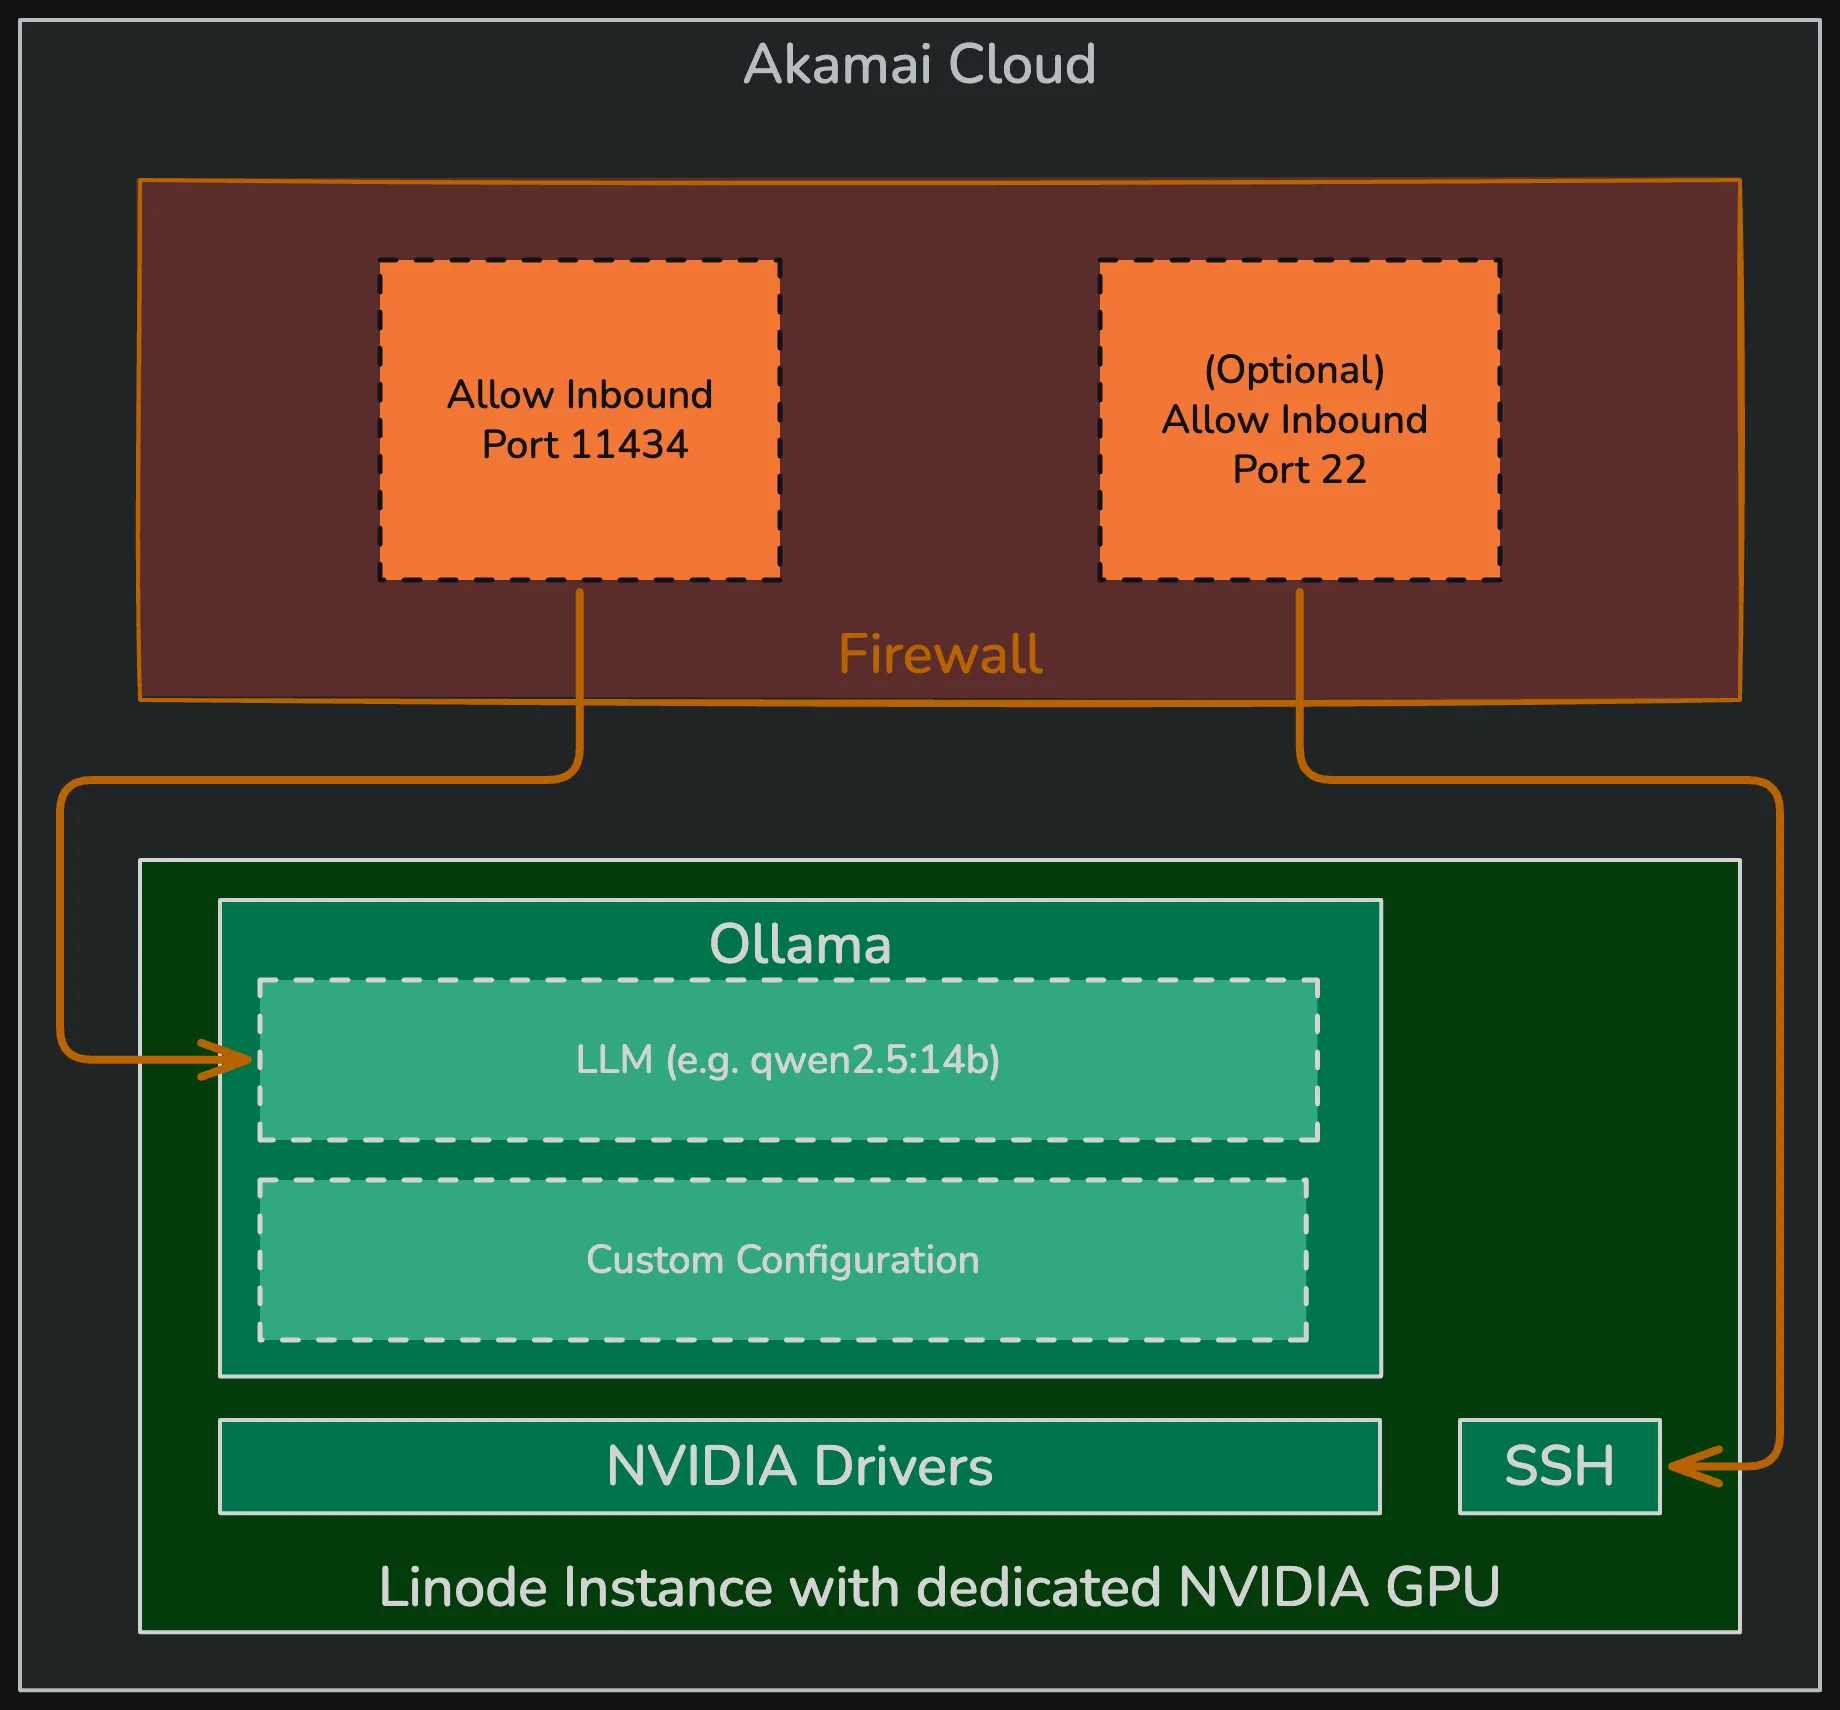
Inferencing Infrastructure at a Glance
For the sake of this article we’ll define a simple inferencing infrastructure using a Linode instance, equipped with a dedicated NVIDIA GPU. In addition to necessary GPU drivers, we’ll leverage Ollama for model serving and download the qwen2.5:14b model, so that our inferencing infrastructure is ready to respond to prompts with no manual interaction at all.
Note: In this article, we’ll expose Ollama via HTTP directly, which is fine for dev-environments. For production grade setups, you should consider fronting the Ollama instance with a reverse proxy and strict SSL enforcement.
Prerequisites
To follow along the instructions shown in this article, you should have the following tools installed on your machine:
git: for cloning the sample repositoryterraform: Terraform CLI (version1.15.6or newer )curl: Used to send HTTP requests (version7.71.1or newer)- (Optional)
linode: Linode CLI to manage Personal Access Tokens (5.68.0or newer)
Additionally, an Akamai Cloud account is required. If you don’t have an Akamai Cloud account yet, you could claim our “$300 Community Perk” and create a new Akamai Cloud account.
Generating a Personal Access Token for Akamai Cloud
As the Terraform project will interact with Akamai Cloud APIs to manage the cloud infrastructure, we must authenticate against Akamai Cloud. The linode/linode provider for Terraform allows authentication using Personal Access Tokens (PATs).
The PAT we’re going to create must have the following permissions:
- Firewalls: Read/Write
- Linodes: Read/Write
- Events: Read Only
Although one could use the Akamai Cloud Manager for managing PATs from the UI, the following snippet illustrates how you could create a token with the necessary permissions that will expire on July 17th, 2026:
linode profile token-create \
  --label demo-token \
  --expiry 2026-07-17T12:00:00 \
  --scopes firewall:read_write,linodes:read_write,events:read_only
The command will print the token to stdout, copy the token and set it as LINODE_TOKEN environment variable, which will be automatically used by the linode/linode provider for Terraform:
export LINODE_TOKEN=<YOUR_PAT>Cloning the Repository and Initializing the Terraform Project
The ready-to-use Terraform project is available on GitHub at github.com/akamai-developers/zero-touch-inferencing-infrastructure. You can clone it with git and download the necessary Terraform providers using terraform init, as shown here:
# Clone the repository
git clone git@github.com:akamai-developers/zero-touch-inferencing-infrastructure.git

# cd into it
cd zero-touch-inferencing-infrastructure

# Initialize the Terraform Project
terraform init
Terraform Variables
The project defines just a handful of Terraform variables which you could use to tailor the infrastructure according to your preferences and requirements. The following table contains all variables, their default values, and a short description:
| Variable Name | Default Value | Description |
|---|---|---|
linode_region | us-sea | Linode Region. Use linode regions list |
linode_type | g2-gpu-rtx4000a1-l | Linode Instance type. Use linode linodes types |
linode_root_password | LoremIp$um!!!2026 | Password for the root user |
allow_ssh | true | Boolean indicating if an inbound rule for SSH access should be added to the firewall |
large_language_model | qwen2.5:14b | Which model should be pulled by Ollama? |
user_tags | (Empty Map) | A map of tags added to all cloud resources |
Top-Level Terraform Resources
As shown in the infrastructure architecture diagram, our project is responsible for managing two top-level resources in Akamai Cloud: The Linode instance and the Firewall which is sitting in front of it.
The Linode Resource
The Linode instance makes extensive use of the Terraform variables we explored before to allow further customization. We use metadata.user_data and point to a custom cloud-init script which we’ll explore shortly.
Last but not least, the local variable all_tags is used to merge a set of default tags with user provided tags to ensure consistent cloud resource tagging:
locals {
  default_tags = ["akamai-developers", "demo"]
  all_tags     = distinct(concat(local.default_tags, values(var.user_tags)))
}

resource "linode_instance" "backend" {
  label      = "inferencing-backend"
  image      = "linode/ubuntu24.04"
  region     = var.linode_region
  type       = var.linode_type
  root_pass  = var.linde_root_password
  tags       = local.all_tags
  private_ip = false
  metadata {
    user_data = base64encode(templatefile("./userdata/linode.yml", {
      desired_model = var.large_language_model
    }))
  }
}
The Firewall Resource
You should always front your Linode instances with a Firewall and define individual rules to limit inbound (and maybe outbound) connectivity. For demonstration purposes, the following Firewall resource will be provisioned with either one or two inbound rules (depending on the allow_ssh variable mentioned above) and allow inbound connections from everywhere.
In a production environment, you should definitely be way more restrictive and allow only certain IPv4 addresses or address ranges (using CIDR notation).
resource "linode_firewall" "firewall" {
  label           = "inferencing-backend-firewall"
  linodes         = [linode_instance.backend.id]
  inbound_policy  = "DROP"
  outbound_policy = "ACCEPT"
  tags            = local.all_tags

  inbound {
    label    = "allow-ollama-http"
    action   = "ACCEPT"
    protocol = "TCP"
    ports    = "11434"
    ipv4     = ["0.0.0.0/0"] # replace with your public CIDR in prod
  }

  dynamic "inbound" {
    for_each = var.allow_ssh ? [1] : []
    content {
      label    = "allow-ssh"
      action   = "ACCEPT"
      protocol = "TCP"
      ports    = "22"
      ipv4     = ["0.0.0.0/0"] # replace with your public CIDR in prod
    }
  }
}
The Null Resource
Simply provisioning the Linode instance is not enough. We must install drivers, software and provide individual configuration once the instance has been provisioned. To make terraform apply wait for all these tasks to finish, we use a null_resource (provided by the hashicorp/null provider) to periodically send HTTP requests to the Ollama endpoint:
resource "null_resource" "wait_for_ollama" {
  depends_on = [linode_instance.backend, linode_firewall.firewall]

  provisioner "local-exec" {
    environment = {
      BACKEND_IP    = tolist(linode_instance.backend.ipv4)[0]
      LLM_MODEL     = var.large_language_model
    }

    command = <<-EOT
      echo "Waiting for model ${var.large_language_model} to be ready (up to 30min)..."
      for i in $(seq 1 90); do
        # Check if the model exists in the tags list
        if [ "$(curl -sf "http://$BACKEND_IP:11434/api/tags" | grep -c "$LLM_MODEL")" -ge 1 ]; then
          echo "Model $LLM_MODEL is ready."
          exit 0
        fi
        echo "  attempt $i/90 — retrying in 15s..."
        sleep 15
      done
      echo "ERROR: timed out waiting for model $LLM_MODEL." >&2
      exit 1
    EOT
  }
}
The Cloud-Init Script
The cloud-init script encapsulates all necessary steps that must be executed in precise order once the Linode instance is provisioned. In a nutshell, it executes the following steps in sequence without any user interaction:
- Update the
aptrepositories and install pending package updates - Install Kernel headers
- Install Ubuntu Drivers (contain GPU drivers)
- Enable the custom Ollama setup script to be executed after a reboot (which is required after driver installation)
These steps are defined in the runcmd section of the cloud-init script. Before these are executed, four files are written to the Linode instance:
/etc/environment: to instruct Ollama where it should store LLMs/etc/systemd/system/ollama.server.d/override.conf: To expose Ollama’s HTTP API on port11434of all IP addresses and to keep LLMs as long as possible in memory/usr/local/bin/ollama-setup.sh: The custom setup script for Ollama, which will also pull the desired LLM/etc/systemd/system/ollama-setup.service: A custom SystemD service that runs when the machine boots and kicks of the custom Ollama setup script (executed only once)
#cloud-config

write_files:
  - path: /etc/environment
    content: |
      OLLAMA_MODELS="/var/lib/ollama/models"
    append: true
  - path: /etc/systemd/system/ollama.service.d/override.conf
    owner: root:root
    permissions: "0644"
    content: |
      [Service]
      Environment="OLLAMA_HOST=0.0.0.0:11434"
      Environment="OLLAMA_KEEP_ALIVE=-1"

  # Runs once after the first reboot (when GPU drivers are active)
  - path: /usr/local/bin/ollama-setup.sh
    permissions: "0755"
    content: |
      #!/bin/bash
      set -euo pipefail

      export OLLAMA_MODELS=/var/lib/ollama/models
      curl -fsSL https://ollama.com/install.sh | sh

      systemctl daemon-reload
      systemctl restart ollama
      systemctl enable ollama.service

      ollama pull ${desired_model}

      # Prevent this service from running again on subsequent boots
      systemctl disable ollama-setup.service

      reboot

  - path: /etc/systemd/system/ollama-setup.service
    owner: root:root
    permissions: "0644"
    content: |
      [Unit]
      Description=Ollama Post-Driver Setup
      After=network-online.target
      Wants=network-online.target

      [Service]
      Type=oneshot
      ExecStart=/usr/local/bin/ollama-setup.sh
      RemainAfterExit=yes
      StandardOutput=journal
      StandardError=journal

      [Install]
      WantedBy=multi-user.target

runcmd:
  - apt-get update
  - apt-get upgrade -y
  - "apt-get install -y linux-headers-$(uname -r) ubuntu-drivers-common"
  - ubuntu-drivers install
  - systemctl enable ollama-setup.service

power_state:
  mode: reboot
  message: Rebooting to load GPU drivers
  timeout: 30
  condition: true
Deploying the Inference Infrastructure
Now that we have walked through all the interesting bits and pieces of the Terraform project, it is time to customize the Terraform variables (if you want to) and provision the cloud infrastructure using terraform apply.
# Provision the Infrastrucutre (skip confirmation)
terraform apply -auto-approve
Depending on the chosen Linode instance type, its region, and the desired LLM, applying the Terraform project could take up to 15 minutes (applying with the default values takes ~5 minutes on average). Once the desired LLM is pulled to Ollama, you should see a bunch of Terraform outputs being printed to stdout:
Plan: 3 to add, 0 to change, 0 to destroy.

# ....

null_resource.wait_for_ollama: Still creating... [05m00s elapsed]
null_resource.wait_for_ollama (local-exec): Model qwen2.5:14b is ready.
null_resource.wait_for_ollama: Creation complete after 5m6s [id=2374230246264369392]

Apply complete! Resources: 3 added, 0 changed, 0 destroyed.

Outputs:

linode_ip = "172.234.214.119"
ollama_chat_endpoint = "http://172.234.214.119:11434/api/chat"
ollama_endpoint = "http://172.234.214.119:11434"
ollama_generate_response_endpoint = "http://172.234.214.119:11434/api/generate"
ollama_list_models_endpoint = "http://172.234.214.119:11434/api/tags"
# ...
Testing the Inference Infrastructure
With the ollama_generate_response_endpoint output printed to stdout, we could immediately ask the LLM to generate a text using a simple HTTP request issued by curl:
# Generate some text
curl -X POST \
  -d '{"stream": false, "model": "qwen2.5:14b", "system": "Answer with a 3 line poem to all questions", "prompt": "Why is the sky blue"}'
  http://172.234.214.119:11434/api/generate
As this is the first interaction with the desired LLM, Ollama must load it into memory first. That said, you should expect a slightly longer response time for the first inference call. Recurring inference requests will be way faster, because the model is kept in memory (Remember the OLLAMA_KEEP_ALIVE variable set to -1 as part of the cloud-init script).
{
  "model":"qwen2.5:14b",
  "created_at":"2026-06-17T13:52:47.818789077Z",
  "response":"Scattering sun's light so pure,\nBlue paints the heavens secure,\nNature's palette, oh so sure.",
  "done":true,
  "done_reason":"stop",
  "context":[/**/],
  "total_duration":880109451,
  "load_duration":175494274,
  "prompt_eval_count":28,
  "prompt_eval_duration":39406000,
  "eval_count":23,
  "eval_duration":622638000}
Tearing Down the Infrastructure
Once you have finished your experiments or you no longer need the inferencing infrastructure, it is best practice to clean up your cloud resources to avoid ongoing costs. Since we have managed everything via Terraform, destroying the infrastructure is straightforward and efficient. Simply run the following command in your terminal from the project directory:
# Destroy the infrastructure
terraform destroy -auto-approve
This command will remove all resources provisioned by the project.
Conclusion
Automating AI infrastructure with Terraform ensures that your environments are reproducible and scalable. By leveraging cloud-init and GPU-optimized instances on Akamai Cloud, you can deploy a fully functional inferencing service with zero manual configuration. This setup provides a solid foundation for building more complex AI-driven applications with confidence and speed.
If you have questions about this setup or want to share your own deployments, we would love to connect with you. Join our new Discord Server at https://discord.gg/uNEU3wWKBQ to engage with our community and stay updated on the latest development trends.