Serverless AI Agents With Spin & Akamai Functions

In this article, I will demonstrate how you can build a truly serverless AI Agent and run it on Akamai Functions - our globally distributed and fully-managed serverless compute platform. Zero cold-starts and the strict WebAssembly sandbox let you run your agents with confidence and the necessary safety net to ensure everything happens within the constraints you define.
The remarkable DX provided by Spin makes implementing AI agents a breeze. We will use TypeScript and Vercel’s AI SDK to implement a simple, yet fully functional AI agent, test in on your local machine, before we deploy it straight to Akamai Functions.
Prerequisites
To code along and follow the instructions presented in this article, you must have two things installed on your system:
- Spin CLI (version
4.1.0or newer) including theakaplugin - Node.js (version
26or newer)
In addition to that local tooling, you must have access to Akamai Functions, and a Large Language Model (LLM). If you want to host models on your own, I recommend reading Fully Automated AI Infrastructures with Terraform and Akamai Cloud an article, I have published a few weeks ago. As an alternative, you can also use hosted LLMs. (More on providers supported by Vercel’s AI SDK later).
What We Will Build
As I want to explain how to build an serverless AI agent, I decided to keep the actual example pretty simple and focus on the bigger picture instead of doing excessive prompt engineering, and implementing numerous tools.
The AI agent we’re going to build is a simple gaming agent. An atonomous piece of software which can identify the user intent by talking to a LLM and use provided tools for actually playing the game requested by the user. As we’ll deploy our serverless AI agent to Akamai Functions, we define a tailored HTTP interface for it, allowing users to interact with the agent by simply sending POST requests.
The Spin application itself will consist of a single WebAssembly component. We’ll implement it using TypeScript. By using Spin variables, we can change the application configuration without having to re-compile the actual source code. We punch a percise hole into the strict deny-by-default sandbox, allowing our component to send outbound HTTP requests only towards the LLM.
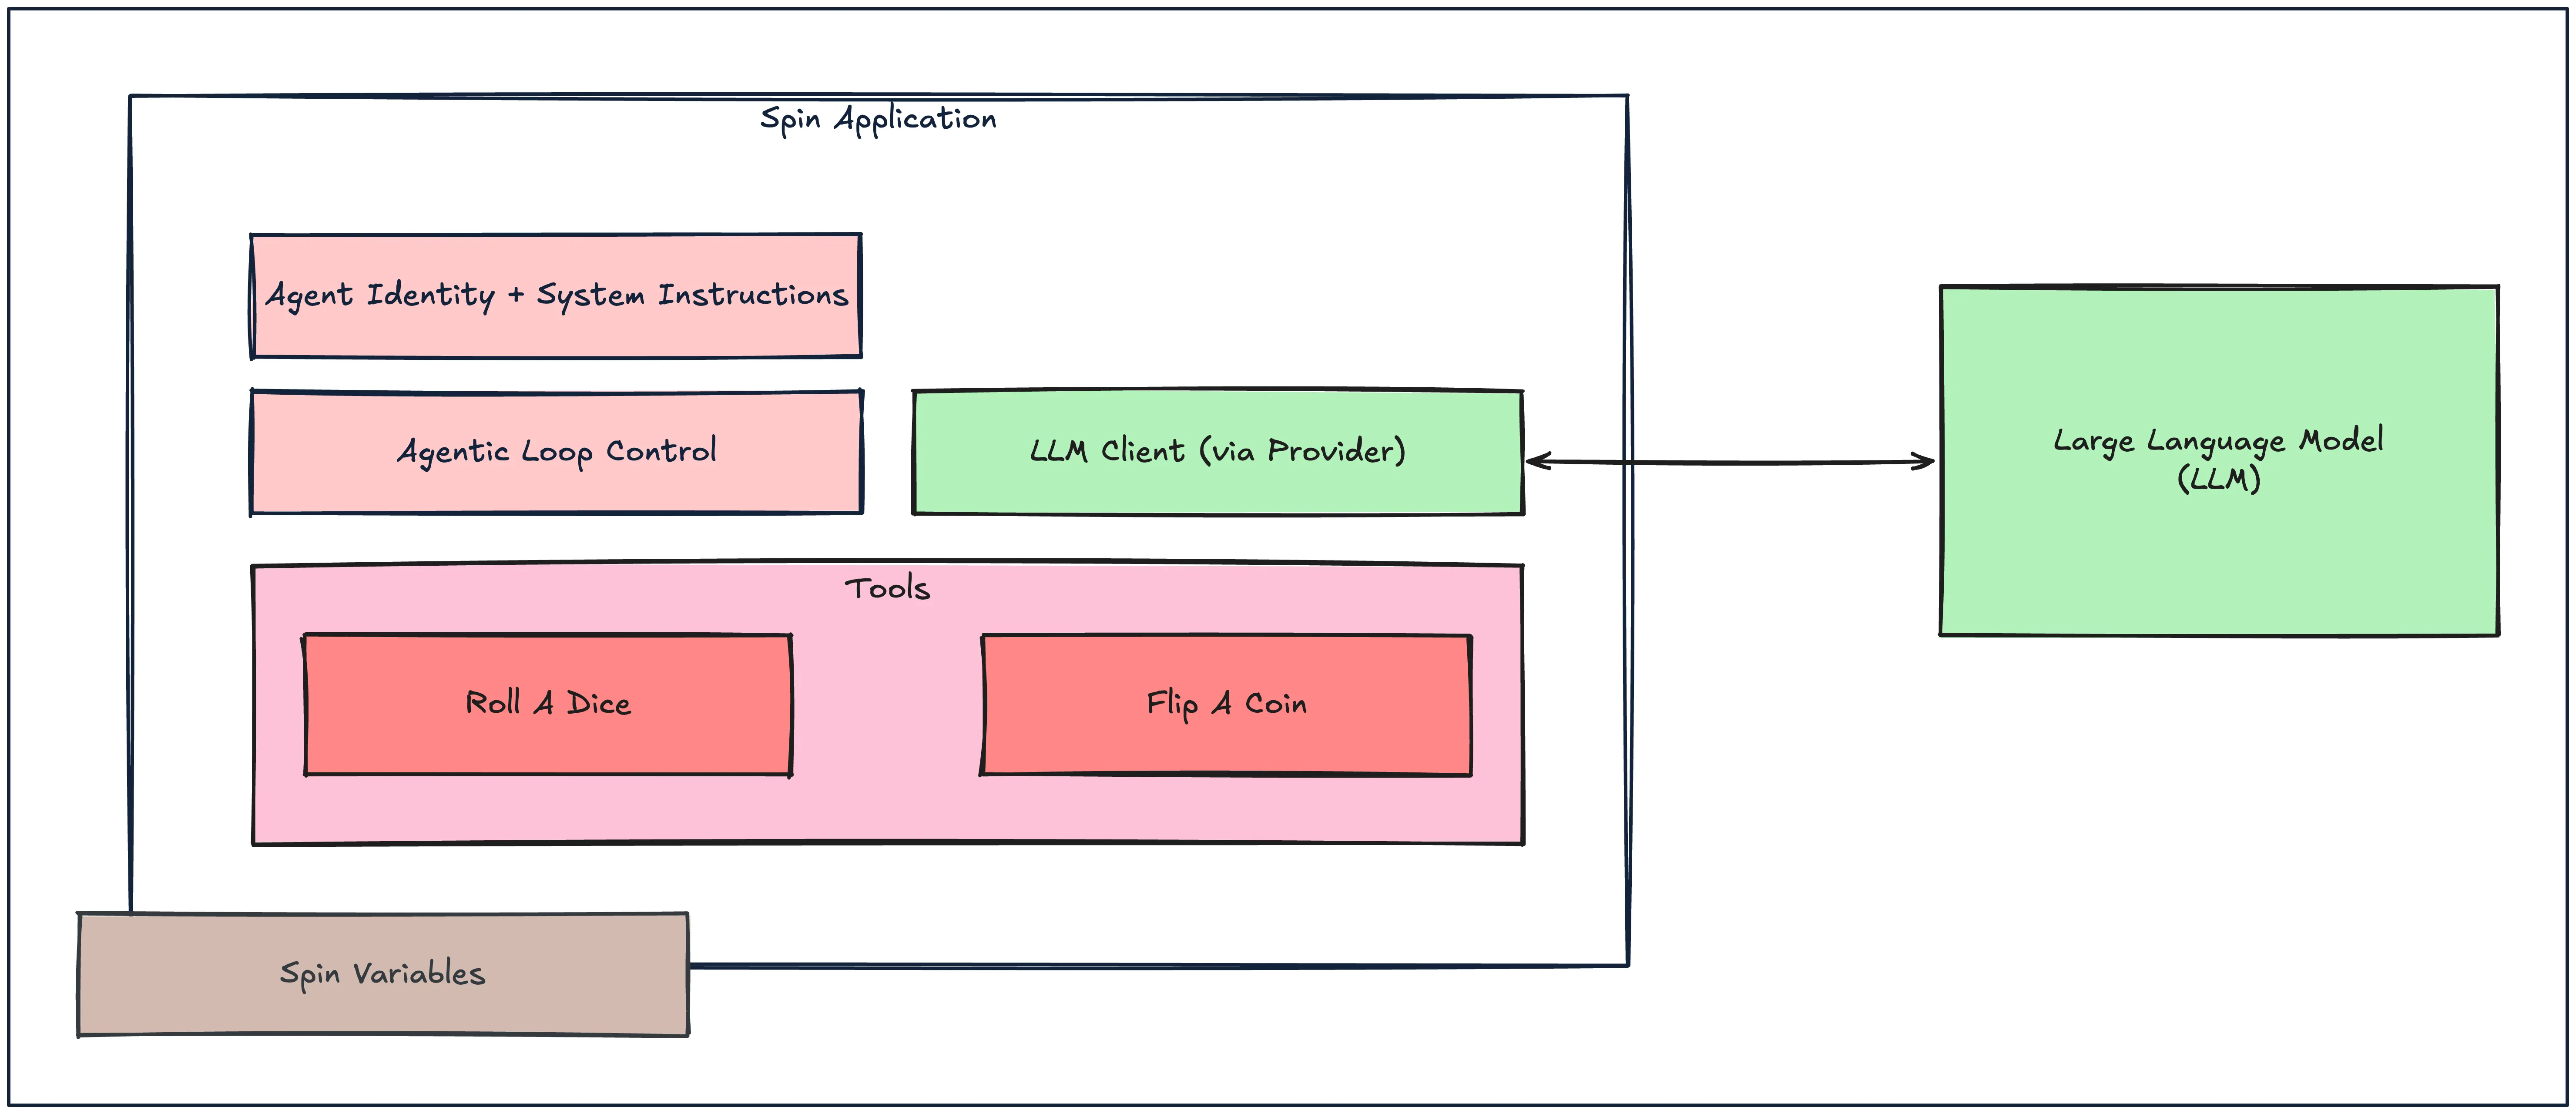
We implement tools and configure the agentic loop using the APIs provided by Vercel’s AI SDK (ai). The AI SDK supports a wide range of different LLM providers. A LLM provider encapsulates the communication between your agent and the LLM. We’ll use the ollama-ai-provider-v2 provider for connecting our agent with a self-hosted model served by Ollama. There are numerous providers you can use to integrate your agent with models served from other runtimes. I recommend browsing through the list of currently available providers.
Scaffolding The Spin App & Getting Started
Okay, let’s get going.
First, we’ll create a new Spin application, install the necessary dependencies:
# Creating the gaming-agent App
spin new -t http-ts \
  -v http-router=hono \
  -v http-path="/..." \
  -a gaming-agent

# Move into the App directory
cd gaming-agent

# Install Vercel's AI SDK & Provider
npm install ai ollama-ai-provider-v2

# Install Spin SDK's variables package
npm install @spinframework/spin-variables
With the application created and dependencies installed, we define our application variables, allow the component to reading them and allow outbound HTTP requests to our LLM. All of these steps are done in the application manifest (spin.toml).
[variables]
llm_base_url = { required = true }
llm_path = { default = "" }
llm_api_key = { required = true, secret = true }
model_name = { required = true }

[component.gaming-agent]
allowed_outbound_hosts = ["{{ llm_base_url }}"]

[component.gaming-agent.variables]
llm_endpoint = "{{ llm_base_url }}{{ llm_path }}"
model_name = "{{ model_name }}"
Cleaning Up The Scaffold & Defining The API Endpoint
The http-ts template generates a “Hello, Spin” handler to illustrate how one could start building applications. Replace the generated implementation in src/index.ts with the following lines of code. It’s essentially a denser version of the scaffold, with sample endpoints and middlewares removed:
import { Hono } from 'hono';
import { fire } from 'hono/service-worker';
import type { Context } from 'hono';
import { logger } from 'hono/logger';
let app = new Hono();

app.use(logger());

fire(app);
Our gaming agent should respond on a single route. An HTTP endpoint accepting incoming POST requests at /play. Create an async arrow function as a handler and simply return an empty JSON result with an HTTP status code 200 for now:
// ...
app.use(logger());

app.post("/play", (c: Context) => {
 return c.json({}, 200)
});

fire(app);
Loading Configuration Data
import * as variables from '@spinframework/spin-variables';

interface Config {
  llmEndpoint: string
  llmApiKey: string
  modelName: string
}
class ConfigError extends Error {
 constructor() {
  super("Invalid App Config");
  }
}

const loadConfig = (): Config => {
  const llmEndpoint = variables.get("llm_endpoint");
  const llmApiKey = variables.get("llm_api_key");
  const modelName = variables.get("model_name");

  if (!llmEndpoint || !llmApiKey || !modelName) {
    throw new ConfigError();
  }
  return {
    llmEndpoint: llmEndpoint!,
    llmApiKey: llmApiKey!,
    modelName: modelName!
  } as Config;
}
The loadConfig function throws if any required variables are not present. Although hono provides different approaches for loading data and passing it around, we’ll simply call the loadConfig function in our handler and return early if an error is thrown:
app.post("/play", async (c: Context =>){
  try{
  const config = loadConfig();
  // ...

  } catch (err) {
    if (err instanceof ConfigError) {
       return c.text(err.message, 500);
    }
    return c.text("Internal Server Error", 500);
  }
});
With a valid config, we can validate the incoming request payload, and prevent invalid payloads from being processed at all:
//...
const config = loadConfig();
const payload = await c.req.json();
if (!payload.prompt) {
  return c.text("Bad Request", 400);
}
Creating the Provider Instance
This section is pretty individual depending on which provider you endup using, code might look slightly different. At it’s core, you must instantiate the a LLM client and provide necessary - maybe provider specific - configuration. To have the agent interact with a model served by Ollama, creating the provider is as easy as bringing createOllama in scope at the beginning of the file:
import { createOllama } from 'ollama-ai-provider-v2';Followed by using that function to create the instance given the configuration data we loaded earlier:
const ollama = createOllama({
  baseURL: config.llmEndpoint,
  headers: {
    'Authorization': `Bearer ${config.llmApiKey}`,
  },
});
Implementing Tools
Having the provider configured, we can implement tools. As mentioned before, the gaming agent will have two simple tools:
- Roll a Dice: a tool allowing the agent to roll a dice. The user can specify how many sides the dice should consist of using their natural language as part of the prompt.
- Flip a Coin: a tool allowing the agent to flip a coin.
Start again, by bringing necessary types into scope:
import { tool } from 'ai';
import z from 'zod';
For both tools we use the tool function, provide a tool desription, a schema to define the expected tool input and code that should run whenever the LLM decides to use the tool:
const rollDiceTool = tool({
  description: "Rolls a multi-sided dice. Specify the number of sides when invoking the tool",
  inputSchema: z.object({
    sides: z.number().describe("How many sides should the dice have?")
  }),
  execute: async ({ sides }) => {
    const min = 1;
    const eyes = Math.floor(Math.random() * sides) + min;
    return { result: eyes };
  }
});

const flipCoinTool = tool({
  description: "Flips a coin. Resulting either in heads or tails",
  inputSchema: z.object({}),
  execute: async () => {
    const side = Math.random() < 0.5 ? "heads" : "tails";
    return { result: side };
  }
});
Implementing the Agentic Loop & Crafting the Response
It’s time for the final piece of the puzzle. We’ve to define the agent and tell it when to stop the loop. Finally, we construct a proper outcome that we’ll send to the callee as HTTP response:
const gamingAgent = new ToolLoopAgent({
  model: ollama.chat(config.modelName),
  instructions: "You're a gaming assistant. You can play only games that are defined as tools. If you receive requests for doing something else or playing games that are not defined as tools respond with a nice message telling the user that you can only play games.",
  tools: { rool_a_dice: rollDiceTool, flip_a_coin: flipCoinTool },
  stopWhen: stepCountIs(4),
  onToolExecutionEnd({ toolCall, toolExecutionMs }) {
   console.log(`Tool ${toolCall.toolName} finished in ${toolExecutionMs}ms.`)
 }
});

const result = await gamingAgent.generate({
 prompt: payload.prompt
});

return c.json({ "result": result.text }, 200);
Again, we must bring the following things in scope, to ensure our code compiles as expected:
import {ToolLoopAgent, stepCountIs} from 'ai';Testing the Agent Locally
Testing an serverless AI agent like this on your local machine is super easy with Spin. All it needs is you compiling and running the application while providing actual configuration data. It’s essentially a single command you run inside of the agent directory:
spin up --build \
  --variable llm_base_url="{your_ollama_base_url}" \
  --variable llm_api_key="{your_ollama_api_key}" \
  --variable model_name="{your_model_name}"
After compilation to WebAssembly has finished, Spin will report back that it started your gaming agent on port 3000. (3000 being the default port, if that one is occupied on your system, you can either append the --listen flag to the command and specify your own listener endpoint or use --find-free-port flag if you want to YOLO it).
From within a new terminal instance, you can sent POST requests to the gaming agent using curl as shown here:
# Ask the Agent to Flip a Coin
curl -iX POST \
  -d '{ "prompt": "Hey, please toss a coin" }' \
  -H 'content-type:application/json' \
  http://localhost:3000/play

# Ask the Agent to Roll a Dice
curl -iX POST \
  -d '{ "prompt": "Roll a 12-sided dice, please" }' \
  -H 'content-type:application/json' \
  http://localhost:3000/play
Deploy the Gaming Agent to Akamai Functions
Having tested your agent on the local machine, it’s time to go from local to global and deploy it straight to Akamai Funcitons.
Assuming you’ve already authenticated against Akamai Functions (spin aka login), your just one command away from having your own gaming agent running fully managed and globally distributed to provide lowest possible latency for your global audience.
# Deploy the Gaming Agent to Akamai Functions
spin aka deploy --build \
  --create-name gaming-agent \
  --variable llm_base_url="{your_ollama_base_url}" \
  --variable llm_api_key="{your_ollama_api_key}" \
  --variable model_name="{your_model_name}" \
  --no-confirm
Note: The --build flag is intentionally used here. Consider it being your safety net, ensuring that the latest version of your source code is compiled down to WebAssembly in an atomic action when deploying to Akamai Functions.
Deployment to Akamai Functions and global workload distribution takes roughly 50-70 seconds. The spin aka deploy command will print the endpoint where your gaming agent will live from now on.
Simply change the endpoints of the curl commands you used earlier and you can test your own serverless gaming agent right now running globally distributed on top of Akamai Functions.
Recap
Pushing your agentic loop to the edge and handing it to your global user audience at lowest possible latency is incredible on its own. But also factoring in, that
- all aspects of your agent run inside the strict deny-by-default sandboxed provided by WebAssembly and WASI
- there is no resource allocation if your agent is idle
- there not being any kind of up-front fee being charged
is really awesome. This stack allows you to unlock a whole new architectural style of running AI agents at scale. In a nutshell it’s leveraging the thrid wave of cloud computing as a foundation for your agentic workloads.
Are you building AI agents? Which kind of work are your agents performing? Join the Edge Case, our developer community over on Discord and let me know! I’m more than curious to hear what you’re building